HCORE
On to the Repair stage of the Xbox 360
Please follow steps 1-12 on the Xbox 360 opening page, now it's time to further disasemble the case, and replace the X clamps.
Step 13. Remove the rest of the screws with the t10 head in read, and the x clamp screws (blue) with the t8 screwdriver

Step 14. Lift the case apart, and place it to the side, you will now have just the inside case of the 360, and the motherboard is no longer attached to it.

Step 15. Lift the dvd drive out of the case unplugging it from the motherboard and placing it to the side. (unplug both cables)

Step 16. Remove the fan vent, and place it to the side. (the white piece, wiggle it until it becomes free)
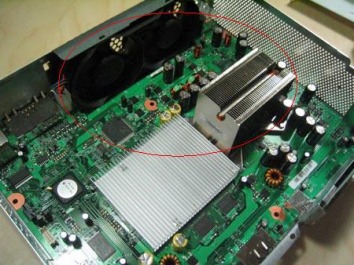
Step 17. Unplug the fan from the motherboard, and gently pry it from the case, put it to the side. (squeeze the plug in order to take it out of the motherboard)

Step 18. Remove the RF board from the front of the case, Gently unclip the ring of lights, and then use the t8 screwdriver to remove the screws attaching the board, then pull straight out. Place it to the side.

Now the entire case and parts are disasembled, gently lift the motherboard out of the case so all that is left is pictured.

Step 20. Gently turn the case over so the x clamps are displayed, this bit is tricky and please dont get frustrated and rush it, using the sharp end of the tool place it between one of the 4 clips on the x clamp and pry it from the motherboard, some can be a little hard to remove and be extremely careful not to gouge the motherboard. Repeat on 3 other clips and then the 4th should be able to remove by hand. Repeat this on the other x clamp. You can keep them as ninja stars, or burn them.

The X clamp's are now off, and the heatsinks free, turn the motherboard over and lift the two heatsinks off. Take note of the original direction that they are laid.

Step 22. Now the two chips are visible, they probably won't look like this, they will probably have a whole heap of bled out thermal paste leaking all over them.
Get your rubbing alcohol (only use a small amount), and cotton bud's and clean off all the old thermal paste, it's quite sticky and will take a little bit of time to clean it all off.
Then use a clean dry cloth to polish the chips to a shine.
Get your rubbing alcohol (only use a small amount), and cotton bud's and clean off all the old thermal paste, it's quite sticky and will take a little bit of time to clean it all off.
Then use a clean dry cloth to polish the chips to a shine.
Step 22 b. Now turn the heat sinks over, the thermal paste will be bled over them too, repeat the previous step on both of them until they are shiny and clean as well.

Step 23. Now remove the 4 old screws from each heat sink, they may be a little stiff just remember to turn left to loosen.
-Step 24. You're now ready to re apply the new thermal paste, place a very small dab on each of the chips, remember that to much is as bad as not enough, it needs a tiny amount.. One tube for each is FAR to much, the other tube is in case you do add to much and need to re apply.
Remember you can always add more.
Gently smooth the paste over face of the cpu/gpu chips with a credit card. You want to end up with a smooth even amount.
25.
Now it's time to use the new hardware, prepare the 8 screws by placing one metal washer and then one nylon washer onto each of them. Follow the picture below, making sure the nylon washers are the ones in contact with the motherboard.
Place 4 of the screws with the set up of washers on them through the slots that either of the heat sinks came from. It's best to balance the motherboard on a table vertically do this so that the washers don't fall off, with all 4 screws in place, Replace the heatsink into it's original position and screw in the screws.
Don't tighten it fully yet, just so that the heat sink is sitting snugly with no movement.
Repeat the step with the second heat sink.

Recap of what has been done so far -
The heatsink's have been taken off, cleaned, the cpu/gpu have been cleaned
Thermal paste has been replaced.
The X clamp's have been replaced with the new hardware kit, all pieces should have been used.
THE NEXT STEPS ARE VERY IMPORTANT, PLEASE FOLLOW THEM EXACTLY!
Now place the motherboard back into the case, but don't screw it down yet, Leave the fan Unplugged, connect the dvd drive (both cables). Plug the RF board with the power button back in, but don't screw it in yet, Plug in your AV cable (it doesn't need to be connected to the tv), and plug the power supply into the console and power outlet.
Now turn your xbox on, you may or may not get the 3 red lights error at this point, either way, let the xbox run until it flashes 2 red lights, when the two left lights are flashing start a timer and leave the xbox on for exactly 2 minutes, NO LONGER! and then turn the xbox back off.
Let it cool down until it is just a little warm to touch, be very careful of the heatsinks, they will be extremely hot, (you might have noticed that before they just got warm, now they are blistering, it's because the thermal paste is actually doing its job!).
While it's still a little warm, unplug the dvd drive, av cable, power supply and rf board and lift the motherboard out of the case again. Tighten the screws again, don't over tighten but make sure they fit evenly and strongly.
You can now re assemble the case in the same order that it was taken apart, plug everything back into the motherboard and screw all the case screws back in, (you won't screw in the old t8 screws now that the xclamps have been removed, these are the circled blue screws in the previous pictures).
Congratulations you have now replaced your x clamps and repaired your console!
Turn it back on and pat yourself on the back!
-This repair works with ~98% of consoles, if it didn't help your's you may wish to repeat the over heating step, this part is important because it reflows the cracked solder, but don't do it for to long or you may further damage your console. If it still hasn't helped their are some other methods you may wish to try (penny trick etc), you can search for them on google or youtube, they are rarely the cause but best of luck with your repair. (you can contact us and we'll point you in the right direction)
If you need any further help, don't hesitate to contact us.
-Thankyou, Jm specials
